
So, I’ve declared this week Bread Week! Yay! Yippee! Wahoooooo!
Okay, I’m done ;)
Tuesday, we had my yummy Beer Bread on the docket.
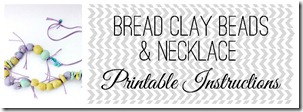
Today, little miss V is gonna share with you how to make these adorable bread clay beads for this fabulous necklace (well, I’m really the one who is gonna share; she can’t really type yet – she’s only 2 1/2 :).

We will learn how to make this super cool, Anthropologie-esque, delightful, kiddo-made necklace!
Did I use enough adjectives for ya? No?
What about spectacular, magnificent, razzle-dazzle (that’s YGG speak), & stunning!
Too much? I need an adjective INTERVENTION – EEK – LOL!
Materials
- 6 pieces of white bread (the super cheap stuff)
- 3 TBS of white glue (I used Elmer’s)
- clear dishwashing liquid
- acrylic craft paint (I used the same brand I used for the Neon Dinos, My Studio Acrylic Craft Paints in: Seaside 72747, Lavender 72759, & Key Lime Pie 72734)
- string
Tools
- toothpicks
- mini cutters (I used these)
- workable mat (I just used an old cutting board)
- bowl
- plastic kids’ needle (I have these)
- scissors

In this kiddo version, I wanted to have as many activities as possible to involve V. She is very hands on, as most toddlers are, and loves helping me with tasks.
I had her start by tearing off the bread crusts and then ripping the bread into small pieces, while I prepared everything else.
While the kiddos are doing this, rub your hands completely in dishwashing liquid to make a seal from the dough’s stickiness. Then in the bowl combine the glue, shredded bread, & a couple drops of dishwashing liquid. Mix thoroughly with your hands, adding more glue if the dough is too dry or more dishwashing liquid to your hands if the dough starts to stick to your hands.
After it is combined, divide the dough into separate batches for each color you would like to make. We made three colors, therefore we divided it into three balls. Add several drops of acrylic paint to each ball and blend thoroughly to get the color you wish to achieve; you may need to add more drops for your desired color. This part is also a great part for the kiddos to do as well. It is a great sensory experience smushing the dough between their fingers, and by using the acrylic paint, which is water-based and non-toxic, it is safe for them to do so. This is another reason I opted for the acrylic paints versus the food coloring. Plus, the acrylic paints provide an easier clean-up and won’t dye their little hands! :)
Once the colors are blended into each ball, have the kiddos go to town with it. Our intention was to make a necklace, so I rolled the balls for the beads while V flattened the dough with her hands creating a pancake, and then used the mini cutters to make shapes. Something else to keep in mind, too, I gave V the mini cutters that were the most simplistic, with the least amount of detail. Due to the dough being very sticky, less detailed shapes will hold up better for the process. Make sure you also grease up the mat & the cutters with the dishwashing liquid so it is easier for them to create.
After all the shapes are made, pierce a hole in each shape with a toothpick, inserting it completely through and leaving the toothpick inside the shape for the first stage of drying. After 2 hours, remove the toothpicks from the shapes by rotating them out of the hole and creating a bigger hole that will make it easier to thread onto string for the necklace. Let shapes dry completely overnight, or longer, depending on the thickness of your shapes.
After this drying period, reinforce holes with another toothpick, then with the plastic kid needle, making sure the needle & string will be able to travel through each shape. Go ahead and thread the needle for your little one, tying a knot at the end. Let them thread the necklace in the order they want (keep in mind this is a kiddo craft; it doesn’t have to look symmetrical or perfect :) Let them have fun threading the shapes (which happens to be a great motor skill activity, too)! Once the threading is completed, finish it off for them anyway you want; there is no rhyme or reason to this process. At this point, V wanted me to add “mama beads” to her necklace, so we went down to my craft room & I gave her some “mama beads” to pick from. I finished it off with the “mama beads” & really liked the frayed pieces (V thought they looked like tails ;), so I added a few more intertwined through the beads.

And, there ya go, kiddo craft perfection!
Mind you, my little miss fashionista demanded to wear this necklace all day.
I had to bribe her with chocolate milk (with whipped cream!) at naptime to get it off of her for her nap ;)
 Well, have fun, and craft on!
Oh…and be sure to check my mama take on this cool way to make clay :)
♥
And here are the printable instructions (click on the button for a printable PDF file):
Terms and Conditions
The above post allows a free printable PDF download; you will need Adobe Reader to do so. It is free to download at Adobe’s website here.
Please read here before you download any of mama miss’s PDF files…thanks, man!

♥
Like what you see?!
You can connect with me on:
Pinterest || Facebook || Twitter || Google +
♥
© Mama Miss. All images & content are copyright protected.
Feel free to share ONE picture and linking directly to this post for download.
Please do not copy directions, ingredients, or pdf files for your own website or Facebook page, visuals or words.
Copying my post partially, or fully, is strictly prohibited.
All work by Mama Miss is licensed under Creative Commons Attribution-NonCommercial-NoDerivs 3.0 Unported License.
♥♥♥

Am loving this innovative idea!! Do you know how long these “keep”, being made from bread? Thanks x
I have no idea Rochelle. I am thinking because they are sealed together with glue, probably a while? V’s necklace is still in one piece & it’s been a little over a month now. If I see it start to disintegrate I’ll definitely update the post :) Hope that helps – thanks for stopping by!
xx ♥ m
No way! This is amazing. I have to do this with my little one. What a great rainy day craft this would be. Thank you for sharing at our
Pinteresting Party!
Thanks Lauren! And thanks for inviting me to your great party too! :):)
xx ♥ m
I didn’t know you could make clay out of bread! That is totally awesome. Your post is so fun to read too. Thanks for sharing at Mom’s Library!
bread=clay!!! :):) Glad you enjoyed reading it too!!
xx ♥ m
You’re so lucky to have a little one at home. My boys wouldn’t tolerate this for more than 5 min….Then again if we could make superhero charms I might be in business.
Thanks for sharing on Show & Tell. I love to see what you’ve linked up every week!
Thanks Tauni! And I love your sweet words you always have for me :) heehe…you should totally make some superhero charms! Once little T is older I’ll have some more “boy” centered activities, but now he’d probably just put them in his mouth ;) Thanks for stopping by!
xx ♥ m
This is so cool! I have never seen anything like it before. Thank you for linking up to The Sunday Showcase.
Thanks Allison – it was fun to make, V loved it! :) Thanks for stopping by too!
xx ♥ m
Your photos are wonderful, and this little kiddo craft is so great! Who knew..bread?!? Just posted on Craft Gossip!! Keep Crafting:)
http://lessonplans.craftgossip.com/?p=6788
Thanks Kristen! And thanks for the feature & for finding me :)
Yep, the wonderful world of bread…so many ideas! ;)
xx ♥ m
That is a great idea. I think our toddlers would try to eat all the bread right now but I will try this when they are closer to V’s age. I pinned this onto my Toddler Crafts board (Capriplusthree). Thank you for linking to Artsy Play Wednesday on Capri + 3. You always have great projects.
: 0 ) Theresa
http://www.multiples-mom.com
awww thanks for your sweet words Theresa! Yeah, little T’s involvement (he’s 1) in the activity was him sitting in the highchair eating the bread – HA – so he kinda helped ;) But yes, you should definitely add it to the kiddo do to list for later! V was telling everyone at the store her necklace she made was bread…it was funny! :) Thanks for popping by!
xx ♥ m